
The Nintendo64 Texture Converter is a GUI based tool which allows you to import images in a myriad of formats, and export them as one of the many different image formats supported by the default Nintendo 64 microcode.
When you start the Nintendo64 Texture Converter, the following form is shown:
On the top, you should have the familiar menu bar. On the left, you'll have a lot of options relating to your image and how it will be exported. On the bottom, you'll have more options relating to how your texture is handled by the export. Note that many similar things can be achieved in different ways, such as: choosing a command from the menu, clicking a button, or by using a keyboard shortcut.
The menu bar on the top of the form features a bunch of different icons. Here is a quick overview of what each one does:
 New: Restarts the program to its
initial state, where no image is loaded.
New: Restarts the program to its
initial state, where no image is loaded.
 Import Image: Loads an image for
conversion.
Import Image: Loads an image for
conversion.
 Import Alpha Mask: Loads a black
and white alpha mask. More information in the
Using Alpha page.
Import Alpha Mask: Loads a black
and white alpha mask. More information in the
Using Alpha page.
 Toggle Alpha View: Switches
between rendering your image or its alpha mask. More information in
the Using Alpha page.
Toggle Alpha View: Switches
between rendering your image or its alpha mask. More information in
the Using Alpha page.
 View Palette: Opens the Palette
viewing form. More information in the
Palettes page.
View Palette: Opens the Palette
viewing form. More information in the
Palettes page.
 Zoom In: Zooms the image view in.
 Zoom Reset: Resets the image
view.
Zoom Reset: Resets the image
view.
 Zoom Out: Zooms the image view
out.
Zoom Out: Zooms the image view
out.
 Rename Output: Allows you to
change the name of the outputted file and array(s).
Rename Output: Allows you to
change the name of the outputted file and array(s).
 Generate Palette: Generates a
basic palette. More information in the
Palettes page.
Generate Palette: Generates a
basic palette. More information in the
Palettes page.
 Compile: Exports your imported
image to the image and file format of your choosing.
Compile: Exports your imported
image to the image and file format of your choosing.
 Open Help: Opens this document.
Upon importing an image into the program, information relevant to your image is displayed on the top left:
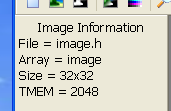
The meaning of each row is as follows:
Rename Output icon button.
Rename Output icon button. Array
names cannot start with numbers, and can only consist of alphanumeric
characters or underscores.
Under the Image Information section, you have the Color Format section:
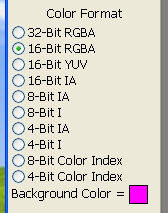
This lets you select the texture format which your image gets exported as, by selecting one of the radial buttons. An explanation of each image type can be found in the Image Formats section of this manual. You can also change the background color of your image, provided it contains alpha, by clicking the colored square. More information on how to use alpha is available in the Using Alpha page.
Under the Color Format section, you have the Export Format section:
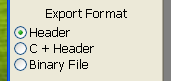
The meaning of each button is as follows:
When exporting an image with palettes's, the TLUT data is placed in the same file as your texel data, albiet in a separate array which uses the same name as your main image, except ending with _tlut. In Binary File mode, a second file is exported instead, following the same naming scheme. More information on palettes can be found in the Palettes page.
If chunking mode is used, the texel array will be split into multiple arrays, albiet ending with _X_Y, where X represents the N'th horizontal chunk and Y represents the N'th vertical chunk. In Binary File mode, multiple files are created instead, following the same naming scheme. More information on chunking can be found in the Chunking page.
Under the Export Format section, you have the Color Previewer
If you mouse over parts of your image, this section will display what that specific texel will be exported as. Each row represents the color and alpha value (be it in RGB, YUV, or I format) in 8 bit format, hexadecimal format, or a smaller format (if applicable). If the smaller format exists, the hexadecimal value will represent that, and not the 8 bit color!
Below the color matrix is a preview of the output texel with all the bits properly combines, in hexadecimal format, as well as a color preview box of the pixel that the mouse is currently over.
If a format that uses palettes is selected, the output texel may show up as ???? if no palette (either an automatically generated one or an imported one) is present. If a palette is present, then placing the mouse over a texel will display the palette value instead (with the color it represents in parenthesis). More information on palettes can be found in the Palettes page.
The bottom bar contains a few checkboxes and selections that allow you to change certain things regarding how your image is exported. This section looks like this:

The meaning of each button is as follows:
Generate Palette: If an image
mode that supports palletes is used, this button will generate a
palette based on the imported image. More information on palettes can
be found in the Palettes page.
Compile Image: Exports the
imported image in the Export Format you have selected. More
information on compiling can be found in the
Compiling Images page.