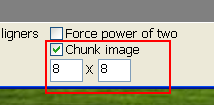
When trying to use large textures, a common method of rendering them despite the TMEM limitations is to break them into smaller chunks, rendering each individually. The Nintendo 64 Texture Converter features a built in image chunking option to aid in this process. It can be enabled by clicking the Chunk image checkbox on the center of the bottom bar:
You can change the amount to chunk by simply typing sizes into the two input boxes. The amount of bytes which your chunk will occupy will be shown on the TMEM section of the Image Properties section, located on the top right, in parenthesis.
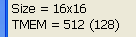 This 16x16 image has been chunked to 8x8, reducing each chunk's TMEM
usage from 512 to 128 bytes.
This 16x16 image has been chunked to 8x8, reducing each chunk's TMEM
usage from 512 to 128 bytes.
Because chunking splits your image into multiple different ones, the name of the exported files/arrays may need to be modified to differentiate between the different chunks. Typically, _X_Y will be appended to the end of the file name (if using Binary File export), or to the end of the arrays. The X represents the horizontal chunking value, and Y represents the vertical chunking value. Both start with 1, and increase based on the number of chunks generated.