As explained previously, all images must be loaded into TMEM in order to be rendered by the RDP. This section will cover some of the effects that can be achieved during this loading process.
If you have 3D modeling experience, you have probably heard the term UV Mapping. You can think of S T coordinates as something similar. S T coordinates are composed of 4 numbers, the first two representing the X and Y coordinates of the top left corner of a rectangle, and the last two representing the X and Y coordinates of the bottom right corner of a rectangle. This rectangle will define how our image will be displayed. Think of it like your image is a flat batch of cookie dough, and that the S T coordinates describe the size and position of your cookie cutter, which will create a hole in the dough. The dough that is inside your cookie cutter will be what the N64 displays.
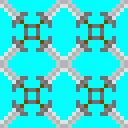
For instance, lets imagine that we loaded the following 32x32 texture into TMEM:
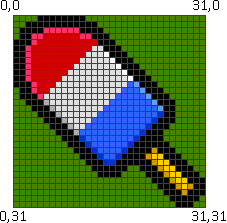
You can think of the image as being in a 32x32 grid of pixels, with the top left corner being X Y coordinate (0, 0) and the bottom right corner being coordinate (31, 31).
 Visual representation of the texture in TMEM.
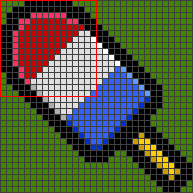
But now, let's say that you don't want to display the full 32x32 image, but rather, only the first 16x16 pixels. In that case, our S T coordinates would be (0, 0) and (15, 15), which is the red square highlighted here:
Which would render the following 16x16 image to the screen:

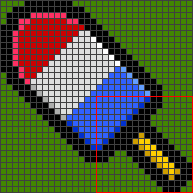
Similarly, if we wanted the last 16x16 pixels, our S T coordinates would be (16, 16) and (31, 31):
Effectively rendering:

By playing with S T coordinates, you can do all sorts of tricks which will be covered shortly.
Without getting too technical, it's helpful to understand what parameters the programmer needs to pass in code to load your texture. The following pseudocode should hopefully give you an idea:
LoadTexture(
    Format,                  // Whether to use RGBA, CI, etc...
    Depth,                   // 32 bit, 16 bit, 8 bit, or 4 bit
    Width,    Height,        // Number of pixels to render
    S_Effect, T_Effect,      // Effect to apply
    S_Mask,   T_Mask,        // Mask to use
    S_LOD,    T_LOD          // LOD to use
);
In case you're wondering what Effect, Mask, and LOD are, this will be covered very shortly.
When loading textures into memory, one of the values which the programmer will need to provide is the mask value. It is a number which represents a power of two , and tells the RDP to perform the operations (which will be discussed very shortly) on this region of the texture. So for instance, a mask value of 4 and 5 tells RDP to perform effects on the first 16x32 texels. The requirement of the mask value being a power of two is a good reason to ensure that your textures are a power of two whenever possible.
As an example, lets imagine the following 16x16 texture:

Your programmer can choose to render it as 32x32, however the N64 is not able to stretch the texture to fit this space. As a result, what happens to the texture is dictated by a combination of the mask value, and the chosen effect.
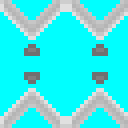
Clamping will cause a texture to repeat its borders' colors. For instance, setting both the S and T effect to clamp, and attempting to render the 16x16 texture in a 32x32 box (with mask values set to 4 on both S and T mask) will yield the following:
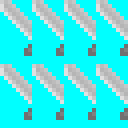
Wrap will cause the texture to repeat itself. Once again, setting both the S and T effect to wrap, and attempting to render the 16x16 texture in a 32x32 box (with mask values set to 4 on both S and T mask) will yield the following:
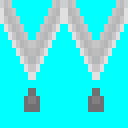
Mirroring is similar to wrapping, except the texture will be flipped. Rendering using the same parameters as the last two effects results in:
Now that you have an idea of the different types of effects possible, I will demonstrate some of the things that can be done by combining different values.
For example, if we try to render our 16x16 texture in a 16x16 rectangle, using a mask value of 3 and 4, we would get the following:

But now, if we enable clamping and render in a 32x32 rectangle, the result will be:
Changing clamp to wrap instead:
And now, changing to mirror:
Both wrapping and mirroring are a very useful tool. Wrapping lets us have a texture repeat on forever (such as a brick texture). Mirroring allows us, with the right S and T coordinate combination, to render a mirrored copy of our texture without needing to have a separate texture (useful for character sprites). Mirroring also allows us to make a texture look larger than it actually is, given that it is symmetrical on one axis.
Changing the LOD value will cause a texture to repeat pixels. For instance, setting LOD to 1 will cause the pixel to be drawn 1 more time after it was drawn, resulting in us being able to make a texture fill the rendered rectangle (if it is smaller, like when we tried rendering a 16x16 texture in a 32x32 box). As an example, this is the result of setting the LOD value to 0 and 1 (rendering the texture in a 32x32 rectangle with wrapping):

The LOD value will not ignore the mask, meaning if we were to use mask values 3 and 4, while rendering in a 32x32 box with mirror, the result would be:
The LOD number can go as high as 15, but from 11 onwards it will actually work backwards. That means that at 15, it will skip every 1 pixel. 14 will skip 2, 13 skips 3, 11 skips 5. Here is what the LOD value of 0 and 1 would look like, rendered on a 16x8 rectangle:

These skips will also be affected by your mask and effects! So for instance, drawing our 16x16 sprite in a 32x32 rectangle with the S and T effect both set to mirror, both masks set to 4, and both LOD's set to 15, the following will be rendered: