Compiling Images
The basic program workflow is very simple. Start by importing an image by
pressing the  Import Image button on
the top left of the menu bar. This will open a folder browser, where you can
search for an image to import. The image must be smaller or equal to 640x480,
and can be in many popular image formats, with and without transparency.
Import Image button on
the top left of the menu bar. This will open a folder browser, where you can
search for an image to import. The image must be smaller or equal to 640x480,
and can be in many popular image formats, with and without transparency.
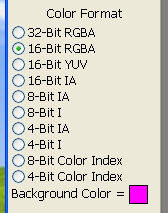
On the left side, you can select the color format which your image will be
exported as:
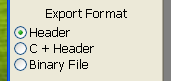
And the file format:
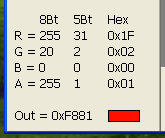
You can preview the exported value of each texel of your imported image by
simply hovering your mouse over it. The value of the pixel, separated by
its components, as well as the final outputted hexadecimal value, is shown
on the bottom right of the screen in a matrix:
If you are using the Color Index modes, you must generate a palette by pressing
the  Generate Palette button on the bottom
right. If a palette is not present, you won't be able to preview colors (they
will show up as ???? instead), and you cannot
export the image. More information on palettes can be found in the
Palettes page.
Generate Palette button on the bottom
right. If a palette is not present, you won't be able to preview colors (they
will show up as ???? instead), and you cannot
export the image. More information on palettes can be found in the
Palettes page.
Once you are happy with how everything is setup, you can compile your image by
pressing the  Compile Image button on the
bottom right, which will prompt you for the path to save the image to. The name
of the exported file can be changed by pressing the
Compile Image button on the
bottom right, which will prompt you for the path to save the image to. The name
of the exported file can be changed by pressing the
 Rename Output button on the menu bar.
Note on Compiling Images Out Of Bounds
If at any time your image gets exported with values that go out of bounds, such
as enabling the Force power of two checkbox, using chunk sizes that are
larger than the image, or using a 4-Bit color mode with an image that has an
odd number of pixels, the outputted value will always be
0x00.